Quickstarting a TurboGears 2 project
| Status: | Work in progress |
|---|
Table of Contents
Now that you’ve got TurboGears installed. TurboGears 2 extends the ‘paster’ command line tool to provide a suite of tools for working with TurboGears 2 projects. A few will be touched upon in this tutorial, check the ‘paster –help’ command for a full listing.
The very first tool you’ll need is ‘paster quickstart’, which initializes a TurboGears 2 project. You can go to whatever directory you want and start a new TurboGears 2 project by typing:
$ paster quickstart
So ‘paster quickstart’ command will create a basic project directory for you to use to get started on your TurboGears 2 application. You’ll be prompted for the name of the project (this is the pretty name that human beings would appreciate), and the name of the package (this is the less-pretty name that Python will like).
Here’s what our choices for this tutorial look like:
Enter project name: Helloworld
Enter package name [helloworld]: helloworld
Do you need authentication and authorization in this project? [yes]
...output...
This will create a new directory which contains a few files in a directory tree, with some code already set up for you.
Let’s go in there and you can take a look around:
$ cd Helloworld
Run the server
At this point your project should be operational. To start your new TurboGears 2 app, cd into the new directory ( helloworld ) and issue the second paster command ‘paster serve’ to serve your new application:
$ paster serve development.ini
As soon as that’s done. Point your browser at http://localhost:8080/, and you’ll see a nice welcome page with the inform(flash) message and current time.
If you’re exploring TurboGears 2 after using TurboGears 1, you may notice that the old config file dev.cfg file is now development.ini. And by default the ‘paster serve’ is not in auto-reload mode.
If you also want your application to auto-reload whenever you change a source code file as was the default in a TurboGears 1’s dev.fg, just add a –reload option. So, to get reloading you’d just type this instead:
$ paster serve --reload development.ini
Then you could access http://localhost:8080 to view the running TurboGears app.
If you take a look at the code that quickstart created, you’ll see that there isn’t much involved in getting up and running.
In particular, you’ll want to check out the files directly involved in displaying this welcome page:
- development.ini : The system configuration is laid on development.ini for development configuration
- helloworld/controllers/root.py gets called to handle URL, and do whatever needs doing to create the data for the welcome page.
- helloworld/templates/index.html is the template turbogears uses to render the the welcome page from the dictionary returned by the root controller. It’s an standard XHTML with some simple namespaced attributes.
- helloworld/public/ is the place to hold static files, such as pictures, javascript, or css files.
You can easily edit development.ini to change the default server port used by the built-in web server:
[server:main]
...
port = 8080
Just change 8080 to 80, and you’ll be serving your app up on a standard port (assuming your OS allows you to do this using your normal account!).
Explore the rest of the quickstarted project code
Once you’ve got a quickstarted app going, it’s probably a good time to take a look around the files that are generated by quickstart, so that you know where things go.
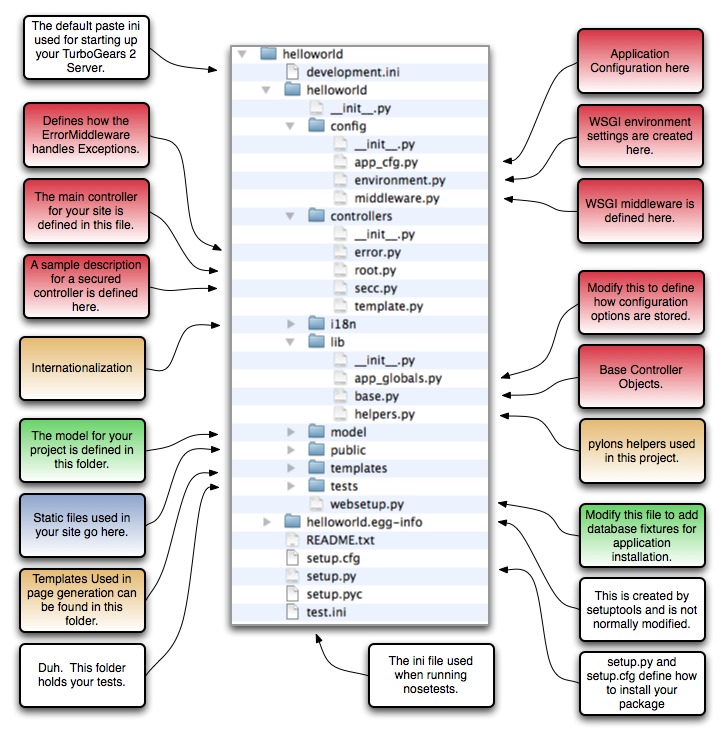
As you can see there are quite a few files generated, but if you look inside them, you’ll discover that many of them are just stubs so that you’ll have a standard place to put code as you build up your project.

Table Of Contents
Previous topic
Next topic
The TurboGears 2 Wiki Tutorial